Hello, Everyone!
Today I’d like to share a quilt project for a very special lady.
When I moved to Reno 24 years ago I worked with a gentleman, he and his wife have become good friends. Over the years I’ve come to love them as my #2 Mom and Dad. Paulette is a professional seamstress; her specialty is Civil War era fashion. I’ve seen so many beautiful garments she’s made- from Civil War dresses to wedding gowns to a Cookie Monster costume for a guy who went to a Macy’s parade in New York!
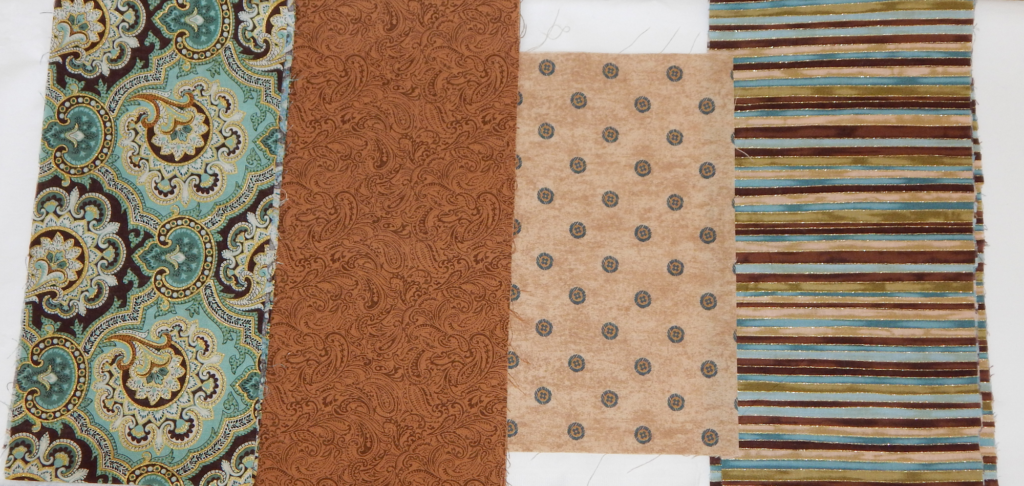
So when Paulette came to me with a pile of fabric and asked me to make a quilt for her I was a little surprised. We were just starting pandemic stay at home time and she was doing other quilting work. Her fabrics included a focal fabric- Paulette had a “love at first sight” at the store, (we all know about that!) a deep teal, blue, brown with gold accents large paisley pattern. The other fabrics were a beige with green button and a medium tan with a paisley pattern. There was also a stripe fabric that had all the colors from the other fabrics rolled into one.
We talked about the fabrics and after that meeting it was clear the teal and brown paisley focal fabric was going to be the star of the quilt. I went through my patterns and picked out a few to share. I also decided to grab graph paper and colored pencils and create. That was a bit of a struggle but I did come up with another idea keeping the original focal fabric goal in mind.
Paulette and I met again. I showed her the patterns; there was one she kind of liked. Then I showed her my colored pencil drawing. She loved it. I said to her, “That center section is 24” square. Are you sure you want one big chunk of “plain” fabric in the center of this quilt?” “Yes,” she said. I grabbed my tape measure (we were standing over the bed) and mapped out a 24” square. “This is how big that will be, in the center of your bed. Are you sure you’ll be happy looking at that for a long time to come?” “Yes!” she said. We chatted some more, I explained how I envisioned the focal fabric to “ripple” away from the center. We decided on chocolate brown sashings. Here’s my colored pencil sketch.

The center square as mentioned is 24” square. The flying geese blocks are 24” x 8”. I call them flying geese but they are not a “true” flying geese. A true goose is twice the length as height. All the other blocks are solid or half-square triangles and are 8” square. The chocolate brown sashings are 2”.
As things went, at this point the quilt measured 86” square. Our target size is 94” x 86”; Paulette and I knew this at the planning stage. Since the stripe fabric wasn’t falling into the design we would use that as the stripe at top and bottom to get to our target length. The top is 97” x 86”. Here it is.
I must say, the look of the quilt struck me differently as I saw the photo. As I was constructing it I had a different vision. My comment sounds strange but I’m having difficulty expressing my feelings. If you have any thoughts I’d appreciate a comment at the end of this blog. I’m thinking about making another one in large, bold florals- that would be another great focal fabric for this pattern.
So my next step is to incorporate some of the scraps from the top into two shams and an “after quilt”.
I learned about this creation from one of the YouTube gals I like. Using the scraps, work them into something that goes on the back of the quilt. That could be a row of blocks, an edge, etc, use your imagination and go for it. When I made the wanna-be flying geese I had to make a template for the wings. I have a bunch of narrow triangle pieces that may turn into diamonds. And I have a dozen OOPS- half-square triangles that are ½” shy of 8”. Lots of things to work with.
I also want to mention the quilting for this project. Paulette is leaving it up to me and she is fine with a simple all-over meander pattern. We chose a soft green/teal thread that goes quite well on the top and looks soft and complimentary on top the darker brown shades. I haven’t shown you the backing fabric but we found a nice thread for that as well.
So, that’s all for now, you’ll have to wait for the next post to see the after quilt, shams and the finished quilt!
Until next time- find some time to sew!